Showing posts with label wip. Show all posts

MG Acguy

Thursday, May 12, 2011 Onderon 0 comments
I purchased this baby over a year ago during the first gunpla building get together I went to which was at COFA and have always been meaning to do something nice with it and since I was in the mood I decided to brush off the dust and get my arse into gear.

From MG Ball

This was the only photo I have of it before I started working on it but I'm sure everyone knows what it looks like

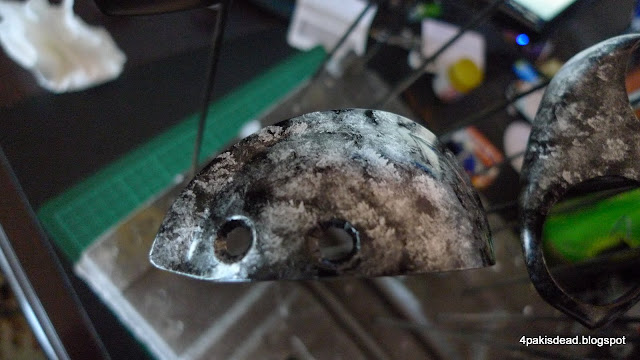
The goal for this project was to achieve a semi decent marbling effect and since I've never tried it b4 I found some spare parts and dabbed on some silver paint with a paintbrush and thanks to my every impressive laziness I opted to brush on a clear color instead of using the airbrush
From Gunpla

Big mistake. The brush strokes literally melted the silver paint so it became blurry but that a side I was confident with what I had to do so I busted out the airbrush and sprayed on a layer of Alclad Gloss Black - which I also forgot to take photos of.

Interesting note. The gloss black was more transparent compared to Tamiya paints so it would require multiple coats to achieve a solid look but since the Acguy was brown to begin with it didn't make much difference and Alclad Gloss Black is super cheap.

After that was to apply the patterns. At first I was planning on varying the tones by using silver and interlacing with white but since I wanted a dark shade of blue as the clear coat I figured the white would become redundant.
From Gunpla

I opted to use a soft bristle brush since it was the less messy.
From Gunpla

N.b. the paint used was Tamiya Chrome Silver and its touch dried in like 5 minutes.
ATTENTION! For all those who attempt the next part remember to lay down a coat of clear coat to protect the patterns incase you screw up the color coat like I did.

Better lighting. Sunlight is the best when it comes to photography =)
From Gunpla

From Gunpla

Notice how the patterns are pretty uniform due to using a brush. I assume using a sponge will yield more realistic patterns.

Managed to do the clear blue today after uni but made a mistake with thinning the paint on my 2nd cup hence half the parts had to be stripped down to remove all the acrylic - Glass cleaner works wonders here. It's like waxing legs minus the pain.
From Gunpla

From Gunpla

From Gunpla

Hopefully I'll remember to mix the paint properly tomorrow
Read more >>

HMM Liger Zero WISP part 1

Thursday, December 9, 2010 Onderon 4 comments
I received my HMM Liger Zero on Wednesday and since I've been itching to build something for a while I got started on it right away (and wash away memories of an unfortunate accident involving plamo some of you may know about).

From gunpla

From gunpla

First off is the box which is stupidly big for a kit of its size. Its a zoid comparable to the Saber Tiger and Lightning Saix. It has slightly more runners than the Saix but pretty much the same as the Tiger so dunno wtf happened with Kotobukiya here.

And here comes the wall of pics with almost no text =)
From gunpla

From gunpla

From gunpla

Can you see my other new baby?
From gunpla

From gunpla

From gunpla

From gunpla


And heres my progress for today.
From gunpla


Like most (all) Kotobukiya kits certain levels of effort are needed to make it look half presentable but since I'm lazy I've just did the bare minimum and cleaned up the parts and added some details along the way
From gunpla


The Liger uses a new type of shoulder joints. The blue thingo is hinged at the top under the OFF-WHITE/CREAMY(yuck) armor and can only swing upwards and since I haven't assembled the legs yet I'm not sure if the joint in the leg will allow it to swing back and forth
From gunpla


The Liger has more color separation than I initially thought it had
From gunpla

Front torso expands foward from mid-section and the sliding mechanism for deploying stabilisers.
From gunpla

Brown tubing is actually hard plastic and comes molded in the same light blue as the shoulder joint.
From gunpla

From gunpla

Rawr
From gunpla
Read more >>

PG 00 Gundam part 2

Tuesday, November 2, 2010 Onderon 0 comments
Following up on what I did since my last post. Pics are self explanatory so I wont go in depth ( lawl like I ever)

First off some bits and pieces for locking mechanism.

From PG 00


I think these are the thickest springs and screws in any Bandai kit to date.

Here we have a exploded view of the locking mechanism for the elbow
From PG 00

One interesting note is that in the manual they fail to mention that part O9 is actually a tool to help with tightening the screws. I didn't know what it was and spent 30mins staring at the manual cos according to the manual there is 6x O9 but in reality you just use the single part 6 SEPARATE times.

Heres what the Elbow lock looks like assembled
From PG 00

From PG 00

From PG 00

As you can see there are many grooves along the inside and outer edges and which brings us to the next picture and another note of interest.

From PG 00

Notice the 2 tabs along the inside of this part. There are many of these at varying depths which are what locks the joints in place once you inserted the spring loaded mechanism ( which is more like an unlocking mechanism). If you're like Tim who likes to rush build his kits and ignore the directions and orientations of certain parts you will fail at this kit since a lot of parts must go in exactly as its shown and no you can't just trim a piece into the right shape Tim.

Next up is the head.
From PG 00

From PG 00

From PG 00

Like all PG's this one also has a light up feature inside the head but unlike the others the LED unit is slightly different

This should look familiar to alot of ppl
From PG 00


My stash of spare batteries once the ones supplied runs out
From PG 00


Tadah!
From PG 00


The LED slides into place via the massive hole at the back of the head
From PG 00


Did I mention big?
From PG 00


Oh yeah heres another example of what I mean earlier about correct orientation cos there's parts like this all over the place
From PG 00


Inner frame for the arm
From PG 00


+ extra layer kinda like the muscles over the bone
From PG 00


One of the disappointing things about this kit was the lack of pre-assembled hands and instead we get this runner to make ourselves
From PG 00


Bandai did help us out though and each finger segment is on the same row so all you need to do is cut out the middle part and insert like so
From PG 00

From PG 00

From PG 00


Since I forgot to take any more photos here's what the 00 looks like without its skin on
From PG 00

From PG 00

From PG 00


One last thing the eyes does not come prepainted so the black outline you see above was painted in by hand and for the illiterate on moonspeak the manual says that to leave out the stickers and markings for the head and eyes if you want to light it up since it will obstruct the brightness and theres not point in having them since the clear parts have all the text etched onto them already.
Read more >>
Related Posts Plugin for WordPress, Blogger...