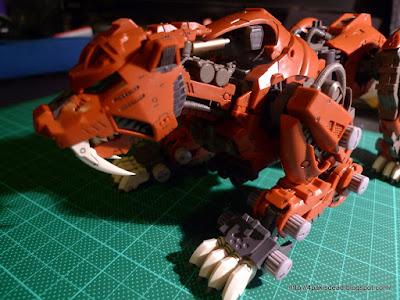
I received my HMM Liger Zero on Wednesday and since I've been itching to build something for a while I got started on it right away (and wash away memories of an unfortunate accident involving plamo some of you may know about).
First off is the box which is stupidly big for a kit of its size. Its a zoid comparable to the Saber Tiger and Lightning Saix. It has slightly more runners than the Saix but pretty much the same as the Tiger so dunno wtf happened with Kotobukiya here.
And here comes the wall of pics with almost no text =)
Like most (all) Kotobukiya kits certain levels of effort are needed to make it look half presentable but since I'm lazy I've just did the bare minimum and cleaned up the parts and added some details along the way
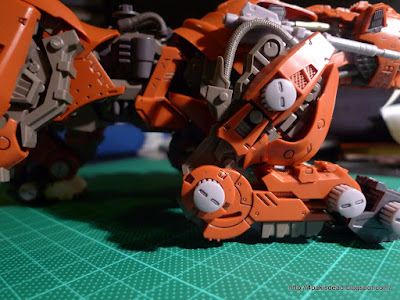
The Liger uses a new type of shoulder joints. The blue thingo is hinged at the top under the OFF-WHITE/CREAMY(yuck) armor and can only swing upwards and since I haven't assembled the legs yet I'm not sure if the joint in the leg will allow it to swing back and forth
I'm sure most of you are familiar with the series so I wont go into it. So after building many humanoid type kits it was a nice change in pace to make something with 4 legs and resembles the terminator of the furry kingdom (I can't believe I just used that word XD)
Anyways enough of that, here's the Command Wolf LC custom
For the blind or misinformed its based on a wolf although it kind of looks like a fox and has a small head like Doudou and is comparatively smaller than the Sabre Tiger I review many moons ago
Despite all the misgivings I throw at Kotobukiya I do have to applaud them for they way the designed the zoid kits. Being animals you would expect them to not only look like one but move like one as well!
So Tomorrow is my big day *hint hint* yet it is also the day of my first exam *huzzah*
What was suppose to be last minute cramming became a lazy day of lounging around, enjoying the peaceful and serene atmosphere and trying to find the meaning of life and my lack of female companionship.
What is a day without my favourite pastime? After milling around for a better half of the day I was hit with the sudden urge to detail up my saber tiger model I built ages ago. Although I promised to paint it (which I haven't gotten around to doing) I broke out my trusty ZIG Millennium marker *read-best panel line pen ever ever ever*
Even though the tiger looks pretty good straight out of the box, simply by adding some lines to hightlight and bring out the edges really makes the shapes jump right out.
The underside was really easy to line due to the width of the lines moulded into the kit although I do have some beef with Kotobukiya's moulding, one word...inconsistent. An otherwise great kit, it was marred with panel lines which go from wide to uber thin and deep to shallow on the same line zzz
As some of you guys may know last week a large package from Japan arrived for me, Koala and Tofu and since I just started my holidays I thought it’s as good a time to get a start on my project.
My portion of the parcel included several cans of spray paint and top coat as well as the pretty smex Cannon Tortoise by Kotobukiya. Incidentally Tim ordered 2 cans of Light gun metal for me instead of normal gun metal...not that there was much difference as I came to realise after testing out my 4 different cans of silver shade sadly.
The Tortoise itself is a rather straight forward kit but provided enough challenge and no small amount of patience from yours truly. A rather small kit compared to what I’m usually familiar with (sits comfortably on my palm and I have pretty small hands) it does no detract from the brilliance of this kit as it is packed with minute details and screaming kickass.
The main draw point of this kit is the cannon on its back and although it is only 7cm long it does not feel disproportioned overall. One note of interest was that I had to do some slight modding to actually get one of the golden pistons to fit thanks to Koto’s moulding inconsistencies. There wasn’t a lot and overall number of faults in the plastic was kept to a minimum but compared to what Bandai pumps out it’s already a few too many.
The cannon sits snugly on the back of the tortoises shell and acts like a turrent which can spin 360 with some minor up and down movement of the barrelwhich is cool. If you look closely you can notice some plugs and holes on the shell and the main body. There are suppose to be extra plating, machinery and small headlights which I haven’t put together yet so I don’t have to worry about those when I’m doing base painting.
The innards is very simple with some nice details of grating on the floor (the zoid is suppose to be able to carry personnel and other stuff inside and that big gaping hole is where the zoid core fits inside (again I haven’t bothered to make that yet). The 2 flaps in the middle flips down and when combined with even more missing parts forms a makeshift ramp.
Obvious differences compared to the old Tomy zoids besides the articulation are those little gray servo caps. The Tomy kits where soft rubber caps while the Kotobukiya zoids uses hard ABS (hooray for painting!)
The underside of the zoid is not left out in the details department. It’s loaded with bolts, grating and insulation tubing which are all molded in brown so painting is a must.
Today was such a shitty day to paint but I just had to get started on it before I put if off for even longer. My Original plan was to do a steam punk type colour scheme with a predominate silver and gold layout and thought that the Champagne Gold would be more vibrant if I under layered it with some aluminium and this was when shit hits the fan.
As you can see there is not much difference with the bottom plate painted in gold. Clearly the aluminium was too strong and the shade of gold was just piss weak. I forgot to mention that I was trying to replace all the green with the gold but I’m more inclined to strip and repaint it now.
I was extremely happy with how the leg plating turned out. It has a very rough and cool metal effect almost bordering on cut pewter look. What I did was vary the distance at which the paint was applied and some prepainting texturing was done with some fine sanding paper.
The tortoise can do some dynamic shots although it really only has the one pose. Oh I forgot to mention the soles of the feet are actually those 2 brown platesabove the head. The kit comes with 6 and 2 of them are used for extra armour which is a really nice touch imo.






 Posts
Posts

